Tuesday, August 31, 2010

Floating Petals Dresser

I am so excited with how this project turned out! Just to refresh your memory, this is an antique dresser that I bought off of Craigslist for $35.00. 


I loved the style and the charming wood  casters on the bottom.  However, the veneer was bubbling and peeling and needed to come off.

I took a heat gun and a putty scraper and removed the veneer from the bottom three drawers and the top of the dresser. It came off quite quickly on two of the drawers, rather it just snapped, and broke off. It was the same situation with the top of the dresser. The third drawer required more work. After removing the veneer, I had to use the heat gun and putty knife once again to scrape and remove the Hyde glue. I neglected to take a picture of this process.

The veneer was fine on the sides of the dresser. I opted to give it a good sanding all over, then primed it with some primer I had on hand. I also went over individual areas with  Kilz Oil Based Spray Primer which always provides great coverage!

I decided that I would decoupage some fabric to the front of the drawers, but was undecided as to what color to use and what style. After weeks of searching, I was drawn to the home decor fabric, Waverly Floating Petals in Blue, that I spotted at my local JoAnn's. Lucky for me, it was 40% off that day and I bought a yard. 

I measured and cut  the fabric  all the way around, so that it was about 1/2" larger than the front of the drawer. I then placed the fabric on some wax paper, and applied Mod Podge to the entire front side of the fabric and allowed it to dry.


 This was so that it would be easier to cut, and not fray when I went to resize it. This was a tip that I picked up from the blog, Mod Podge Rocks!  One thing that I neglected to do, but should have done in hindsight, was to wash the fabric first so that it would have shrunk up a bit.

The next step was to apply Mod Podge to the drawer front, place the fabric on top, smooth any bubbles and let it dry.


Once it was dried, I turn the drawer upside down, with the fabric on top of a cutting board, and took an Exacto knife and cut around the edge of the drawer front to trim off the excess fabric. I initially tried a rotary cutting tool, but couldn't get the angle and found that the Exacto knife worked better.


Then I applied 3 layers of Mod Podge glue  to the top of the fabric to seal it. I let it dry between each coat, and used a damp rag to smooth out any bubbles I came across.  Had I prewashed the fabric, I am certain that I would have had less issues with the bubbles and the fabric stretching as much as it did.

The top drawer got a coat of Rustoleum's Slate Blue, as well as the drawer pulls on the three bottom drawers. I opted to use the existing hardware since I liked them initially. The drawer pulls on the top drawer were painted white to give it a contrast from the blue, and the entire dresser was just painted with a white latex semi-gloss paint that I had on hand from a project I had done two years ago.

So here it is all finished!

I am pleased with how it turned out. It does have a few bubbles here and there, but I know what to do differently next time.

Here is a  close up of the knobs.


Happy to be done with this one, and happy with where my creativity lead me.

Linking to:

Visit thecsiproject.com


Funky Junk's Saturday Nite Special

Sunday, August 29, 2010

Meringue Dresser

Dresser #1 is done! I told you that I was on a mad dash to get some projects done!

So here is the Craigslist dresser before:
I stripped the paint off of the tops and sides, before I decided I was too tired and lazy to do anymore.

So it got primed with some Kilz Primer, sanded, and then painted with Krylon Indoor-Outdoor Spray Paint - Satin Meringue.

And VOILA!

Here it is!
This  dresser went in my youngest daughter's room. There was a bit of a shadow when I took the picture, hence the darker color towards the bottom of the picture.  Her room is decorated in greens, pinks and yellows. The storage book bin, was the blue one that I bought a couple of weeks ago. I spray painted it with Krylon's Ballet Slipper and put some books in it.

The knobs on the drawers, I hand painted different designs with some acrylic paint to give it some character.


Then I outlined the details with a black fine point Sharpie Marker.

I like how it turned out. What do you think?

Saturday, August 28, 2010

I'm Around!

This past week has been insanely busy! Sunday we made a quick trip out of state to see my in laws before they flee to the south for Fall and Winter. Lots of driving. In three days we did 1160 miles... too much time spent in the car!

Also on my busy-ness..

I  got a Cub Scout Day Camp out of the way today. I am the Committee Chair for our pack and had to plan, delegate, and carry out a Day Camp today. It was long, tiring, but fun! The boys had fun and things ran smoothly.  Everyone followed through on their assignments. I am just happy that it is done!

 I know what you are thinking, "But you have just girls and no boys?" They asked me to be the Chair for the pack a year ago and I said, "Sure!" At first I was out of my element, but then started to learn the ropes, get more training and feel more comfortable with the Cub Scout program.  I have enjoyed it so far. I  grew up in a scouting household and my mother has been involved with Cubs and Boy Scouts on some level for the past 20 years or so. All three of my brothers are Eagle Scouts.
So it's kind of fun, in an odd way... for me at least.

And finally, on the creative side, I have been painting a ton! The two dressers and bookcase are just about done and will be revealed in the next few days.  I am excited where my creativity, some paint, fabric, and mod podge has taken me with one of my dressers. So much fun!

Saturday, August 21, 2010

Just a few more things...

Garden and flowers are still growing like crazy. I am patiently waiting for the tomatoes to finally turn red. On just one plant, I have counted 21 green tomatoes. I can't remember what variety they are.

My other tomato plant is a golden pear/ cherry tomato. Actually is is more like a small tree, than a plant as it has gotten huge.

The lone pepper plant still just has ONE pepper. But it is getting bigger everyday.

The crookneck squash are doing well and there are several on that plant as well.


I thought I would also share a few of my flowers. My delphiniums really look great! I attribute that to lots of fertilizers. Delphiniums are heavy feeders.


The flowers in the hanging baskets and pots are doing quite nicely as well.  However, I am getting to that point in summer, where I am getting a bit tired of yard work.

And on another side note, I broke my promise to my hubby and picked up more furniture... I couldn't help myself.

I saw this dresser advertised on Craigslist for $15.00 and liked it! When I went to go see it and pick it up, the lady that was selling it said that she had a bookcase that I could have for free, if I wanted it.

Yeah, I like free!  Then when I came home, I found some loose change in one of the drawers of the dresser. So the bookcase and dresser ended up costing me a grand total of $14.83!  Not bad.

I did promise my husband I would get some projects completed soon! My goal is to have the bookcase, dresser, and this dresser :
completed in the next week or so.  I am having surgery in a couple of weeks and will be out of commission for doing big projects for awhile.
The dresser that is on casters has had all of the veneer stripped off of it, and I have primed it.
The bookcase is partially primed, and the newest white dresser, I am in the process of stripping the paint.

After getting them all primed, the hardest part is always trying to decide what color to paint them and if I should do some decoupaging or not.

I am going to have to think about that one a bit.

Wednesday, August 18, 2010

Mirror, Mirror On The Wall.

Once again, here is the mirror that I picked up at the Goodwill this past Monday for just $9.99. Heavy mirror, plastic frame.


A little bit of primer, some paint, and a bit of distressing, and it was good to go! I hung it in my dining room. It really opens things up quite a bit.


The chandelier shades, I started tweaking last night. I may have something ready to reveal there as well, soon!

But that's it for now.

Cost:
$9.99 for mirror.
Had primer, paint and sandpaper on hand.

Linking to:


Visit thecsiproject.com

Tuesday, August 17, 2010

Some More Bargains

Here are some more thrifty finds that I have picked up recently.

This mirrored silver tray - well, not REAL silver, I found at a garage sale a month or two ago for $1.00.  I cleaned it up and it makes a great centerpiece focal point on my dining room table.


The hydrangeas are from my garden, and the lead crystal bud vase was a wedding gift from a former university piano instructor that I had over 16 years ago.

Here it is with a different set of flowers.


My brother and father gave my mom different bouquets of flowers for her birthday this past weekend. When it was time to pack up and leave the rental vacation home, my mother put them all in one vase and gave them to me, since she still had around 15 hours of driving to do to get home, and I only had a few hours.  I have really been enjoying the bright colors.

Yesterday, on my way home from a Dr.'s appointment, my 9 year old and trusty thrifting sidekick wanted to stop at the Goodwill. She likes to look for clothes. Don't ask me why, she has a lot! However, that is her favorite thing to look for at garage sales and thrift stores.

I picked up this huge mirror for $9.99. 


I love how it is reflecting my apple tree in this picture.
The frame is plastic, but nothing that a little spray paint can't fix. There was another mirror next to it, same size and same style, but it  was white with some gold trim, and they wanted $20 for it.  It was a no brainer, get the cheaper one. It is pretty heavy and I have grand plans of mounting it on the wall in my dining room.  I have already primed and painted it, but am in the process of tweaking it. I hope to have it finished by tomorrow to show it to you.

I also picked up this cute little storage bin that can mount on a wall for only $2.99. I am going to paint it and hang it in my daughter's room and put books in it.  

I have realized that Mondays just might be the best time to hit the thrift stores as everyone was cleaning out their garages and donating over the weekend.  There was a lot of new inventory which I had not seen before.

Here is an awesome apothecary jar that I found at a garage sale two weeks ago for only $1.00.


I filled it with cotton balls and put it in my bathroom.

I always get a thrill when I find something cool for very little money.
Linking Too:

Sunday, August 15, 2010

Back From a Blissful Vacation

Why does vacation always seem to go by so quickly? I just got back from a fun family reunion on the Oregon Coast with my parents, siblings and their families.  I thought I would share a few photos from my 4 days of bliss.


Here is the house we rented for the 23 of us.
 

The view from the balcony. I never got tired of just staring at the ocean.  Lucky for us, the weather cooperated and it was beautiful.

The super comfy bed and room that I stayed in.


The kitchen where lots of messes were made, calories eaten and many memories were made.


A shot of a suspension bridge that I crossed on a day hike with my family.

The view of a pier near one of the restaurants that we ate at.

 And best of all, spending time with the family enjoying the beautiful Pacific Ocean.

Can't wait to go back.

Wednesday, August 11, 2010

And it didn't cost a thing.

The good thing about all of those creative bloggers out there, is that you learn a few tricks and gain inspiration from others. I would like to say that I have some original ideas, but alas, not so many.

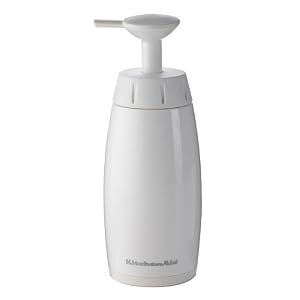
In my kitchen, for several years, I had a soap dispenser - a kitchen pump, from Kitchen aid that I loved. It was heavy duty, easy to use with the kids, and easy to clean.

A few months ago, I found that it was leaving puddles of soap on the counter top and realized that the silicon on the bottom was leaking in several spots. I tried to fix it, but it was just a no -go, so it go donated to the Good Will.

I then tried to locate another one just like it in town, but with not much luck. I was too cheap to spend the money to order one + shipping on the Internet.

So out of desperation,  I bought a clear soap dispenser out of the bath section at Walmart. It lasted a mere month before it fell into my sink and broke. I tried to Krazy Glue it back together, but it was a lost cause. So the big soap container sat on the counter for a few days. It was a bit harder for the kids to use, without that pump, and they ended up leaving a mess.

Then yesterday, I remembered all of those homemade Mason Jar soap dispensers that are circulating out in the crafting world, and thought about making one.

I got my supplies together, all of which I had on hand. The pump I had to dig out of the garbage and the original plastic bottle that it was attached to, a body wash, had been thrown in the recycling.

The jelly jar I had on hand, as well as the canning lid and ring.

This was SO EASY.


I used the largest drill bit that I had and drilled a hole into the lid. It still wasn't large enough to fit the pump through, so I took an Exacto knife and cut a larger "x" to accommodate the size. Then I cut the pump tube way down, so it would fit in the jelly jar. It was a tight fit, so there was no need to glue it.

Filled it with soap, and was good to go.


It's cute, functional, and best of all, I just used items that I already had on hand. It took just a few minutes to make.

Linking to:

 http://linda-coastalcharm.blogspot.com/

Monday, August 9, 2010

A Partridge... Not in a pear tree.

This one's for the birds.

Inspired by all of those lovely spray painted ceramic birds out there floating around in Blog land, I have been collecting a few birds here and there. It seems that there is no shortage of partridges... particularly this variety.

I paid .75 for both of these guys at a garage sale, brought them home, and with a little bit of spray paint, transformed them into this:


Then this partridge here,


Was transformed as well, into this bird here.


And as a brief side note, I thought I would talk about my tchotchkes in this corner.  The plate stand was $2.99 and came from the GoodWill a few years ago. The plates are from St. Vinny's and were only .49 each. The silver candlestick was $1.00 at a garage sale. The lead crystal candy dish was a wedding gift, from 16 years ago. That thing ALWAYS stays out, and typically is filled with candy or gum. Just ask any friend or family member that knows me. LOL. The Gorham Lead Crystal salt and pepper shakers were also a wedding gift. They are pretty, but I have never put salt and pepper in them. They came from a dear friend. The  floral "thing" came from Big Lots last year and was $5.00.  The candles I had on hand and the other candle holder came from Goodwill and was .50! The table my dad made for me several years ago. It was a honey oak color, and I painted it white a few months ago. 

O.K.... back to the birds.


I have no before pictures of this next guy, but he was also spray painted.

And this rather innocent looking owl was .75 at a thrift store and way too cute to paint. He didn't get painted. My youngest daughter, aged 9, is a crack up. We were at a local hardware store the other day and I was in the garden area. I saw a couple of very large plastic birds, one was a hawk and the other was an owl. They were ugly, tacky and meant to serve as a decoy to keep rodents and other pests away from your garden. Nonetheless, I was a bit intrigued by them, thought they were tacky as well and just picked the owl up to look at it.
My 9 year old piped right up. "No MORE birds Mom! We have all these birds in our house and they are just sitting there. Just sitting there staring at our guests. It's creepy."

I stifled a giggle and explained to her that I was NOT going to buy this bird.

She's not a fan of the birds I guess.

I'm linking to:
Visit thecsiproject.com http://linda-coastalcharm.blogspot.com/